4-4: Networks
When Docker is first installed on a system, the network configuration changes in a way that's surprising the first time you see it. Run ip a s on your Docker host.
Amongst the network interfaces, you'll notice docker0. It has an IP address of 172.17.0.1/16. What's going on here? Let's try running a container to see what's going on.
docker container run -dit --rm alpine:latest
Now that it's running in the background, let's inspect it using our jq tool again.
docker container inspect <container> | jq '.[] | .NetworkSettings.Networks'
You can of course just run
docker container inspect <container>, but this cuts to the heart of the matter.
We see a bridge network configuration here, with a gateway and IP address in the 172.17.0.0/16 subnet. Sound familiar?
When we stand up a container, by default it is joined via a network bridge to the docker0 interface, and given an IP on that subnet. The gateway, as you see, is that docker0 interface, meaning our host serves as the router (and DNS server, by default) for all Docker containers we start.
Creating Networks
But we don't have to live with defaults. Let's create a new network and—just for funsies—let's make it use a different address space.
docker network create --subnet 10.10.99.0/24 mynet
docker network ls will now show us our new network. Note that the driver defaulted to bridge, which is what we wanted.
Now, let's start a container that's attached to our custom network. We do so by passing the --network command line option.
docker container run -dit --rm --network mynet ubuntu:latest
Now when we re-run the docker container inspect command above to see the NetworkSettings, we can see that the Gateway and IP Address are in the subnet we defined for mynet!
Go ahead and bring down that container.
Why Use Multiple Networks?
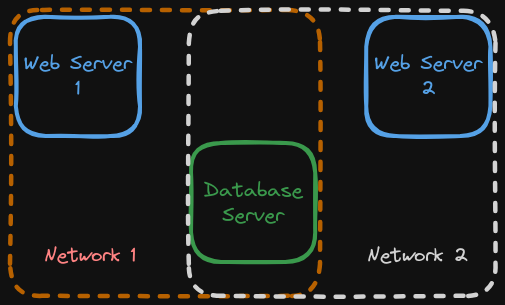
It seems silly to go to all this trouble. Why bother? Imagine I had a web application made of two services—a web server and a database server. Now, these would be able to communicate with each other on the default bridge network anyhow, but now imagine that I had another application that, for whatever reason, I wanted to share the same database. I need the second app's web server container to communicate with the original database server, but maybe I don't want to allow that web server to access everything else on the default bridge network.
A diagram may help.

Now, I've isolated the web servers from one another. Is it perfect? Certainly not, but I've reduced the attack surface of each individual network, and may add additional defenses to the database server, the single pivot point.
Multiple Networks Demo
Let's create two more networks: net-1 and net-2 for our purposes.
docker network create net-1
docker network create net-2
And now, let's create some containers—one on each network, to start.
docker container run -dit --name ubuntu-1 --network net-1 ubuntu
docker container run -dit --name ubuntu-2 --network net-2 ubuntu
docker container run -dit --name ubuntu-3 --network net-1 ubuntu
So we've created three containers. The first two are attached to their respective networks. The third, for now, is attached to net-1, but that's honestly just a matter of sequencing. The idea is to connect ubuntu-3 to both network. We can do this with docker network connect.
docker network connect net-2 ubuntu-3
Now, docker container inspect ubuntu-3 | jq '.[] | .NetworkSettings.Networks' will show us two networks for the container. Also notice that Docker intelligently changed the subnets for each, despite us not providing that configuration.
Hostname Resolution
Let's start a shell in ubuntu-3 to play with our networks.
docker container exec -it ubuntu-3 /bin/bash
In theory, this machine is connected to both networks we created and should be able to contact both ubuntu-1 and ubuntu-2. You might think we should have gone to get the IP addresses of both of those before jumping into this shell. I mean, we could reasonably guess that the addresses are 172.19.0.2 and 172.20.0.2, respectively, but here's the thing.
We don't have to. Docker has yet another networking trick up its sleeve: it performs transparent hostname resolution for containers.
Let's install ping to get started. Yes, these containers are even missing ping.
apt update && apt install -y iputils-ping
Now, we can successfully run:
ping -c 4 ubuntu-1
ping -c 4 ubuntu-2
How about that? The hostnames resolved! This feature becomes critical in heavily interrelated multi-container applications. Think about it: we won't necessarily know any IPs that services might have to connect to, but we can control hostnames.
Imagine a WordPress application done in Docker. You might have one container for the PHP code/webserver, and a second for the database. The database config then could use a container name as its hostname rather than a clunky IP address.
This is not theoretical; we're going there next. Let's stop all our containers and remove all our networks. Here's a quick way to stop all running containers:
docker container ls | cut -d " " -f 1 | tail -n+2 | xargs docker container stop
Then you can clean up stopped containers and networks with their respective prune commands.
And now, we're ready to explore how we really build multi-container applications: Docker Compose!
Check For Understanding
- Create a new network using a custom subnet. Attach an existing container to this network.